Uploading images to the forum and including them in a post.
The first way to include an image in your post is to upload it to our site and include is at an attachment into a post.
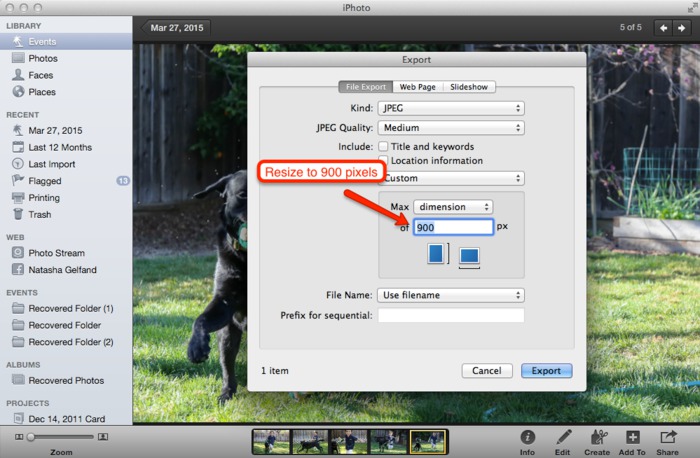
First, make sure your images are no larger than 900 pixels along the biggest dimension. Our software rejects large images. To resize your image, you can use any popular photo editing phogram, like iPhoto.
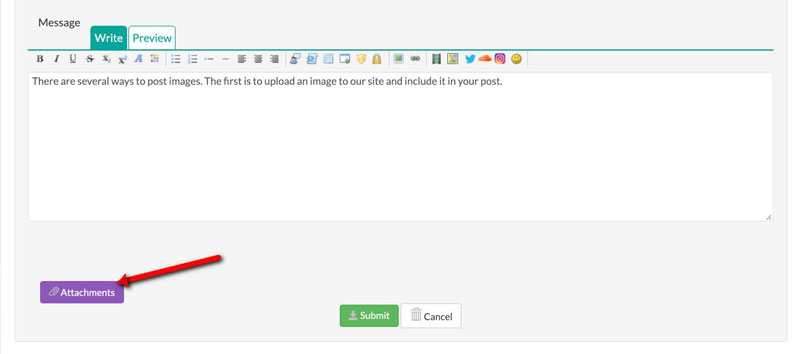
Start a new post, and write some text. When you are ready to include an image, click on the purple "Attachements" button.
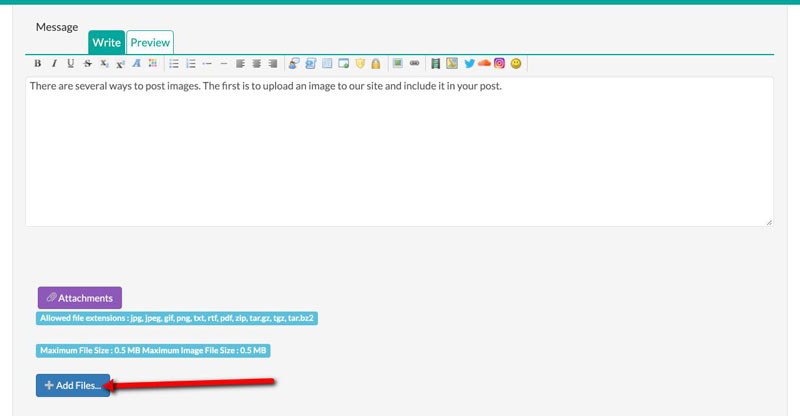
This will cause a new area of the page to appear, including a blue "Add Files" button. Click on this button.
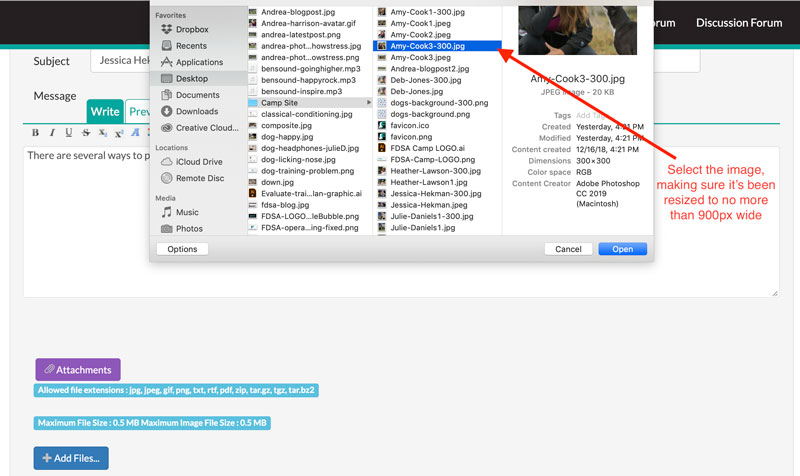
Once a File Dialog opens, navigate to the folder where you stored the resized image and select the file, then click "open."
The selected file will appear in the Attachment field. You now need to tell it where in your post you want the image to appear (if you skip this step, the image will still upload, but it will appear at the bottom of your post as an "attachment")
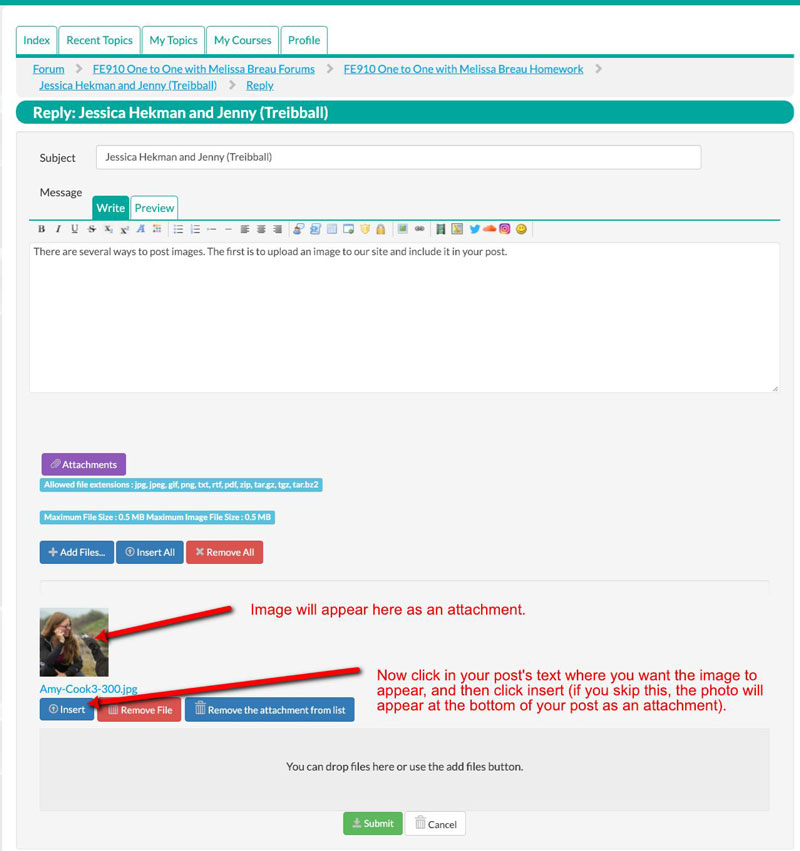
After you click "Insert" the code that tells our system to include the image in the post will appear in your post's text.
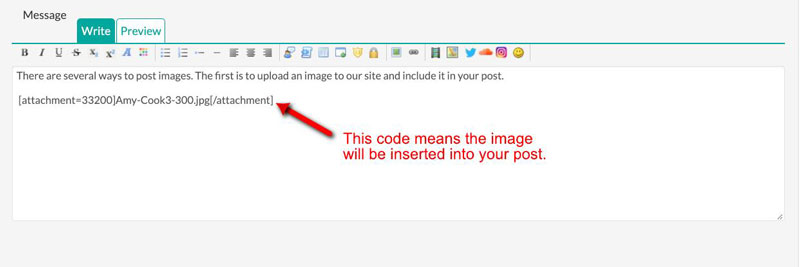
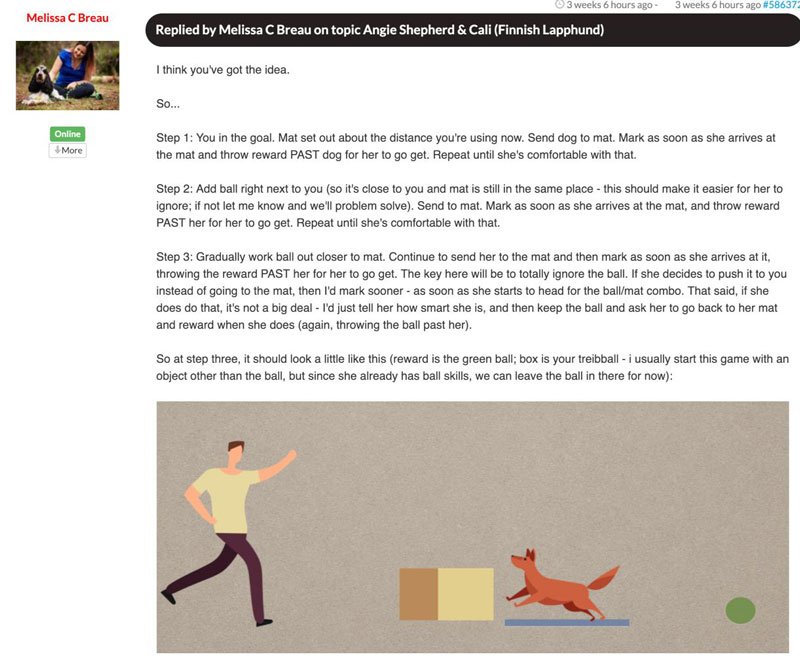
Now click "Submit" and your post and image will appear in the post!
You can also insert multiple images this way, however, keep in mind that the total size of all images uploaded cannot be very large, otherwise, the whole post will be rejected (no more than 2Mb). So do not include too many images in one post. If you are posting a large number of images, it might be better to make a Google+ album and post a link to it (see instructions on how to do that below).
Troubleshooting!
If you keep trying to insert an image but it doesn't appear in your post please check the following:
1. The size of the image is no more than 900 pixels in the largest dimension.
2. The image is a jpg, gif, or png
3. If you are including multiple images, the total size is no more than 2Mb. Too many photos, or too large photos are the main reason uploads fail. Your post wil appear, but the photos are just going to be discarded. Try posting fewer photos per post!
4. If you are still having trouble, you can try uploading images to an external site such as Google+ Photos or Flickr, and posting a link to the images or the entire album as described below.
Including an Image from an External Site (Google+, Smugmug, or anywhere else on the web)
Our forums also support a way to include images from other websites. For example, if you find a cool photo somewhere on the web and want to post it, you don't need to download it, then upload it to the forums, you can post a link to it directly. This will save you a lot of steps!
First navigate to the site that has the image that you want to include. If you are using a photo sharing site, click on the image so it displays in your browser. For example, below I am including an image from Google photos. I navigated to my Google photos account (photos.google.com), selected the album that has my image, and then clicked on the image thumbnail to open up the larger version.
The trick now is to get the address of the image itself and include it in the forums. Most browsers allow you to copy the address (or URL) of an image when you right-click (or control-click) on it.
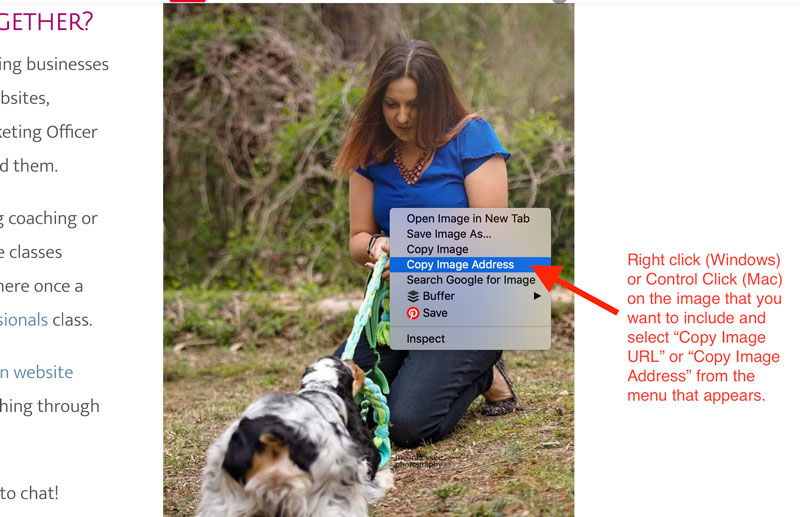
After you click "Copy image URL" (sometimes it's called Copy Image Address) the address of the image will live in your paste buffer and you can paste it anywhere you want by pressing Control-V (windows) or CMD + V (Mac). The image URL usually ends with a .jpg or .png, except if you are using Google Photos, when it's just a bunch of text. You can test if you have the correct URL copied by opening a new browser tab and pasting the URL there. You should get your image and nothing else.
Now you get to use one of those cool editor buttons in the toolbar. Image Link says "Insert an image into the post that lives at the address that I will give you." Ensure that your mouse cursor is where you would like the image to appear in your post.
Then click on the Image Link button (it looks like a photograph of a tree) and a new module will appear. Past your image URL into the URL field (Ctrl + V on Windows; CMD + V on Mac).
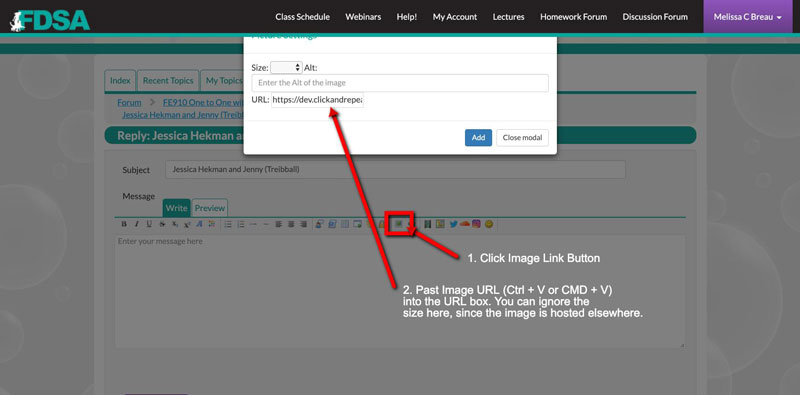
Here's my URL pasted into the correct field. You can optionally specify the size, but if you leave it blank our system will choose the right one for you.
Once you have added the link, click on the blue "Add" button to add your image to your post.
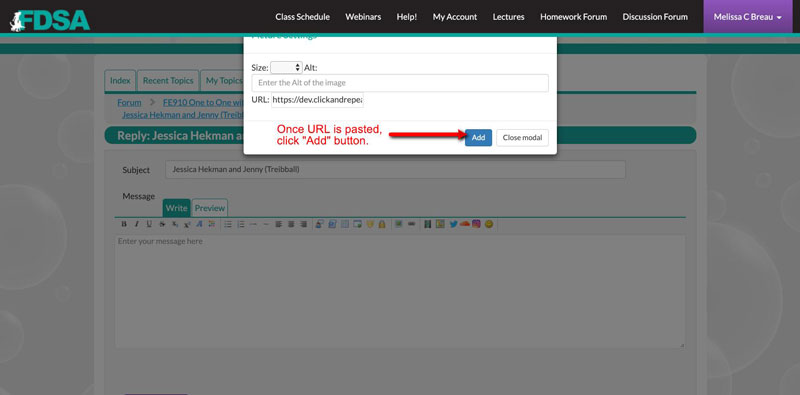
One you click "Add" the URL gets copied into your post, with some additional code.
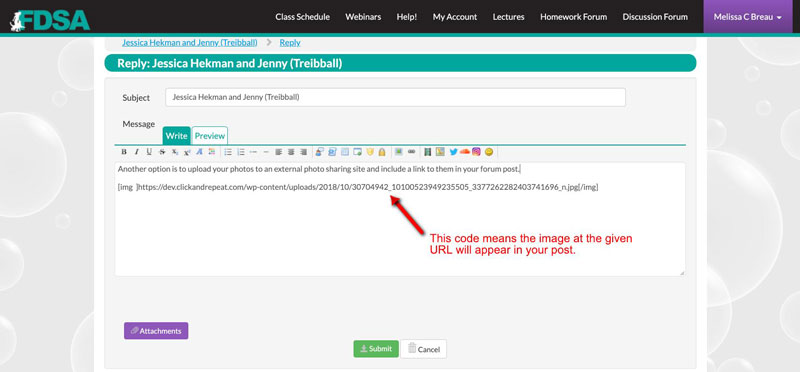
Click "Submit" and your image should appear in the new post.
Posting a link to a Google Photos album
This method works best if you have a lot of images to post. You can upload them to an external website (Google Photos in this case, and then post a link directly to the album).
Thank you Amy Johnson for the instructions.
Setting up your Google Account
You will need a Google account to submit assignments for this course. You can use an existing @gmail.com account or create a new one. Even if you already have an @gmail.com Google account, you should know that you will be creating public albums for this course, which will show up on your Google+ feed. You will also need to disable certain settings that you may want if you also use Google+ for your personal photos. So, you might consider creating a new account for this course if either bothers you.
Try to get this done before June 1 so that you are ready for the first assignment. If you have problems, there will be a thread in the class discussion for troubleshooting.
Creating a New Account
If you need to create a new account, you can do so here: https://accounts.google.com/SignUp
Configuring your Account for class assignments
Google automatically manipulates the photos that you upload. These enhancements include contrast, saturation, sharpness, and other factors. Sometimes these changes look good; sometimes they don't. However, as students in a photography class, you don't want Google doing photographic enhancement for you. Unfortunately, Google turned on Auto-Enhance for the entire world by default.
While this may sound great, it will mean that the hard work you spend taking and processing your photos will be incorrectly manipulated by Google. We want to see your photographs, not a collaboration between you and a Google algorithm.
To disable these features, navigate to your Google+ account settings: https://plus.google.com/settings
You will need to leave "Allow viewers to download my photos and videos" checked so that I can download them in order to give feedback. The other two options at the top are optional and have no bearing on this class. I personally would uncheck them both.
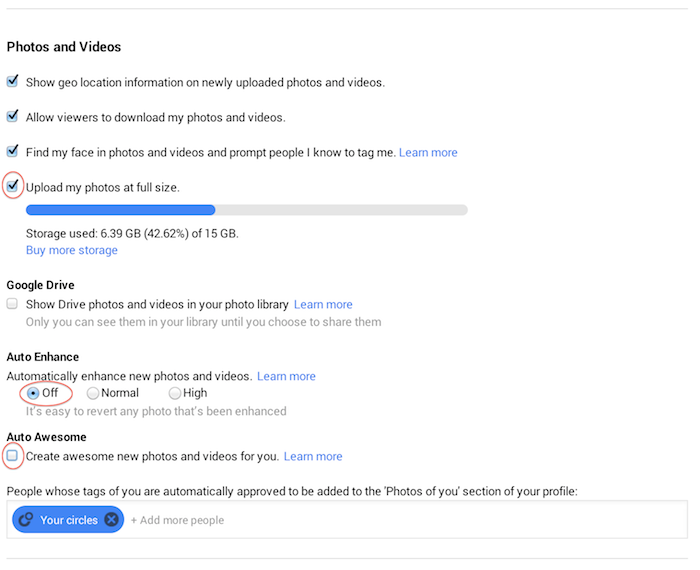
Scroll down to the Photos and Videos section and make the following changes:
• Ensure that "Upload my photos at full size" is checked
• Change "Auto Enhance" to Off
• Ensure that "Auto Awesome" is not checked
You can also delete "Your circles" from the bottom field if you prefer. We will not be using tags in this class.

If you want to see what Auto-Enhance does, feel free to turn it on and upload some photographs. If you hover over a photograph you own, you can flip back and forth between the enhanced and original versions. Make sure to turn it off again before uploading any images for class assignments.
Uploading Your Assignments to Google+
To upload your assignments, you will need to create an album. The name isn't particularly important, but I recommend using "FE600 Assignment 1" for the first assignment, and using a similar variation for each week's assignment.
Start on the Google+ Photos page: https://plus.google.com/photos
Click the "Upload Photos" on the menu bar.
Select the photos that you would like to upload. Don't forget to add the photos to an album.
When prompted to share the album, click "Skip".
The next step is to generate a link for the album. Click the small arrow near the top-right corner of the pane. Select "Sharing Options".
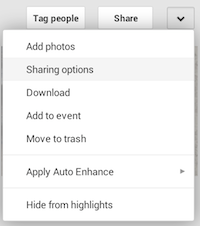
Then, click "Share via Link".
You can add and delete photos from this album while you are working on it. But, you should finish uploading and fix the order of your album before submitting it on the forum.
This link is what you will copy and paste in the homework forum when you are ready for my feedback. If you close the window and something goes wrong while you are trying to get it pasted into the forum, you can always follow the steps to generate the link again. You should also include questions or problems that you had in completing the assignment.
Now, upload a couple of your favorite pictures to a new album (call it "Test Album" or something like that) to your account. Post the link to your thread in the homework forum just to see how the process works. When you create the post with the link to the pictures, feel free to write any stories that may go with the pictures. If you know how to do it, include the EXIF data (just the date taken, shutter speed, aperture, ISO, lens focal length) as well. If that last sentence sounds like a foreign language to you, don't worry about it.